An air fryer uses convection to crisp food with minimal oil, offering a healthy alternative to deep frying. Air fryers have taken the culinary world by storm in recent years, and it’s easy to see why. These handy appliances circulate hot air around your food, producing a crunchy, “fried” exterior with only a fraction of the oil used in traditional frying. The result? Golden, crispy delights that satisfy your comfort-food cravings without the excess grease or guilt. From French fries to fried chicken, almost any of your favorite indulgences can be lightened up as healthy air fryer recipes.
In this article, we’ll introduce you to the health benefits of air fryer cooking and share 10 delicious healthy air fryer recipes for a guilt-free crunch. Whether you’re a health-conscious eater or just looking to cook your favorites in a lighter way, these recipes have you covered. We’ve got everything from veggies and proteins to even a sweet treat – all cooked to crispy perfection in the air fryer. Let’s get frying (the healthy way)!
Why Air Frying Is a Healthy Choice
Air frying isn’t just convenient – it’s also a smarter choice for your health. Here are some reasons why cooking with an air fryer can be better for you than traditional frying:
- Much Less Fat & Calories: Air fryers use very little oil compared to deep-frying. One study found that air-fried foods are substantially lower in fat than their deep-fried counterparts. In fact, using an air fryer with just a tablespoon of oil can slash the calorie content from fat by up to 75–80% compared to deep frying. This means you can enjoy “fried” food with significantly fewer calories and less unhealthy fat.
- Crispy Results Without the Guilt: Thanks to the magic of hot air convection, air-fried foods come out crispy on the outside and tender inside, mimicking the texture of deep-fried food. You get that satisfying crunch and flavor with only a spritz or spoon of oil, so you can indulge in favorites like fries and wings guilt-free.
- Lower Acrylamide Formation: Deep frying starchy foods (like potatoes) at high heat can produce acrylamide, a potentially harmful compound. The good news is air frying drastically reduces acrylamide – by up to 90% in one study. So your air-fried potato and veggie chips contain far less of this unwanted substance than the deep-fried versions.
- Quick, Convenient & Less Messy: Air fryers cook faster than a conventional oven and preheat in minutes. They also won’t fill your kitchen with oil splatter or heavy fumes like deep frying can. Less oil, less mess, and easier cleanup make healthy cooking simpler.
- May Preserve Nutrients: The rapid cooking and lower oil exposure may help foods retain more nutrients. Research suggests that air-fried foods can hold onto certain vitamins (like vitamin C) and antioxidants better than deep-fried foods. Plus, without submerging food in oil, you avoid degrading healthy oils or adding trans fats.
With these benefits in mind, it’s clear why air frying has become a go-to for healthier cooking. Now, let’s dive into some yummy recipes! Below you’ll find 10 healthy air fryer recipes – from veggies to proteins to even a dessert – each with that irresistible crunch. For each recipe, we provide ingredients, easy instructions, approximate prep and cook times, and a note on nutritional benefits. Enjoy the crispy goodness!
1. Crispy Air Fryer Sweet Potato Fries
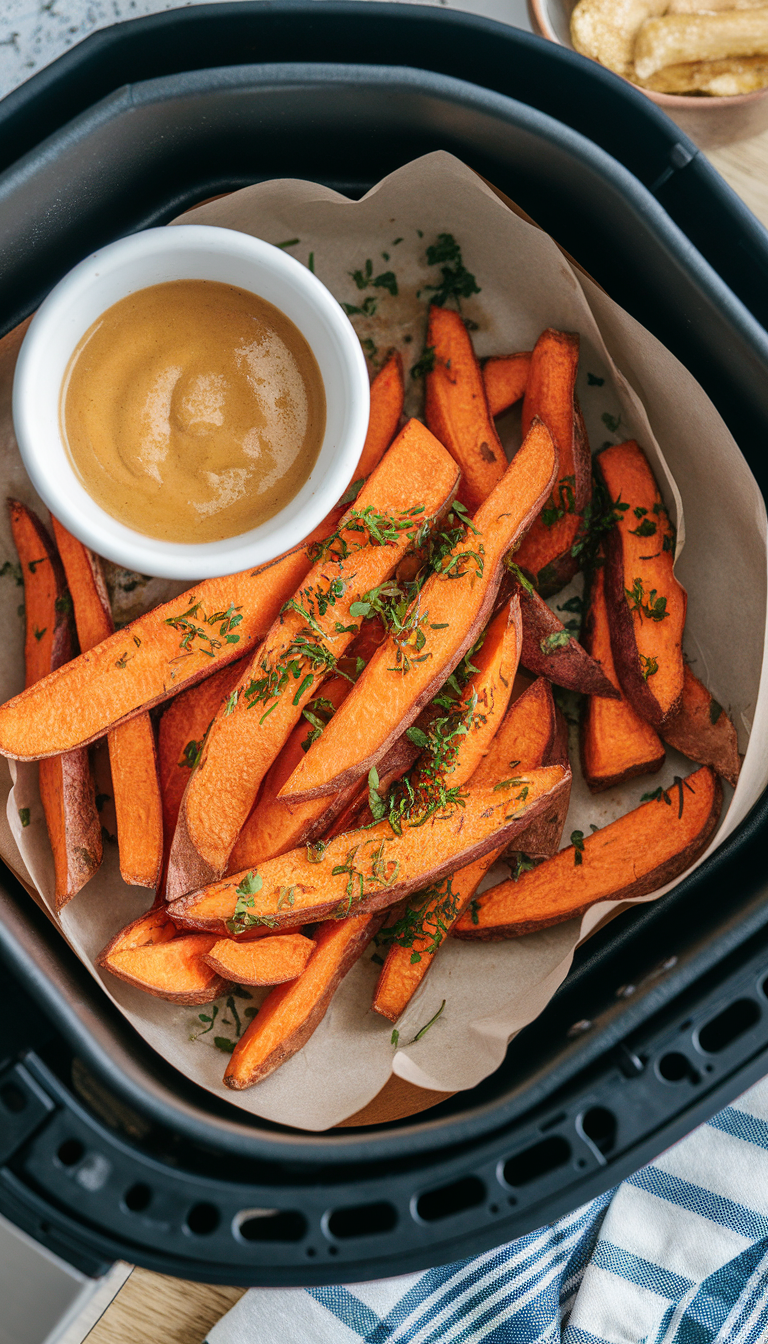
Prep Time: 10 minutes | Cook Time: 15 minutes | Yield: 4 servings
Who doesn’t love a basket of fries? Sweet potatoes make this version extra nutritious, and air frying makes them golden and crispy with minimal oil. These healthy air fryer sweet potato fries are the perfect guilt-free side for burgers, sandwiches, or snacking on their own.
Ingredients:
- 2 medium sweet potatoes (about 1 lb or 450 g total), peeled
- 1 tablespoon olive oil (or avocado oil)
- 1/2 teaspoon garlic powder
- 1/2 teaspoon paprika or chili powder (for a spicy kick)
- 1/2 teaspoon salt, or to taste
- 1/4 teaspoon black pepper, to taste
Instructions:
- Cut the Sweet Potatoes: Slice the sweet potatoes into thin fries (about 1/4-inch thick). Try to cut them in uniform thickness so they cook evenly. Pat them dry with a paper towel to remove excess moisture (this helps them crisp up).
- Season: In a large bowl, toss the sweet potato sticks with olive oil, garlic powder, paprika (or chili powder), salt, and pepper. Coat all pieces evenly. Using just a bit of heart-healthy oil will help them turn golden and delicious without deep frying.
- Preheat and Arrange: Preheat your air fryer to 375°F (190°C) for 3 minutes. Spread the seasoned sweet potato fries in the air fryer basket in a single layer (cook in batches if needed – overcrowding will make them less crispy).
- Air Fry: Cook the fries at 375°F (190°C) for about 12–15 minutes, shaking the basket or flipping the fries halfway through cooking. They’re done when they’re nicely browned and crisp on the outside and tender inside. If they need more color, add an extra 2-3 minutes.
- Serve: Remove the fries and enjoy immediately while hot and crunchy. For extra crispiness, you can air fry in two stages (cook 8 minutes, shake, then an additional 5–7 minutes). Serve with a healthy dipping sauce like Greek yogurt ranch or just ketchup.
Nutritional Benefits: Sweet potatoes are a nutrient-packed alternative to regular fries. They are rich in beta-carotene (vitamin A), vitamin C, fiber, and potassium. Unlike deep-fried french fries, these air-fried sweet potato fries are low in fat and contain no trans fats. You get the satisfaction of fries with far fewer calories – truly a guilt-free crunch! Plus, the olive oil adds a dose of heart-healthy fats.
2. Garlic-Parmesan Air Fryer Brussels Sprouts
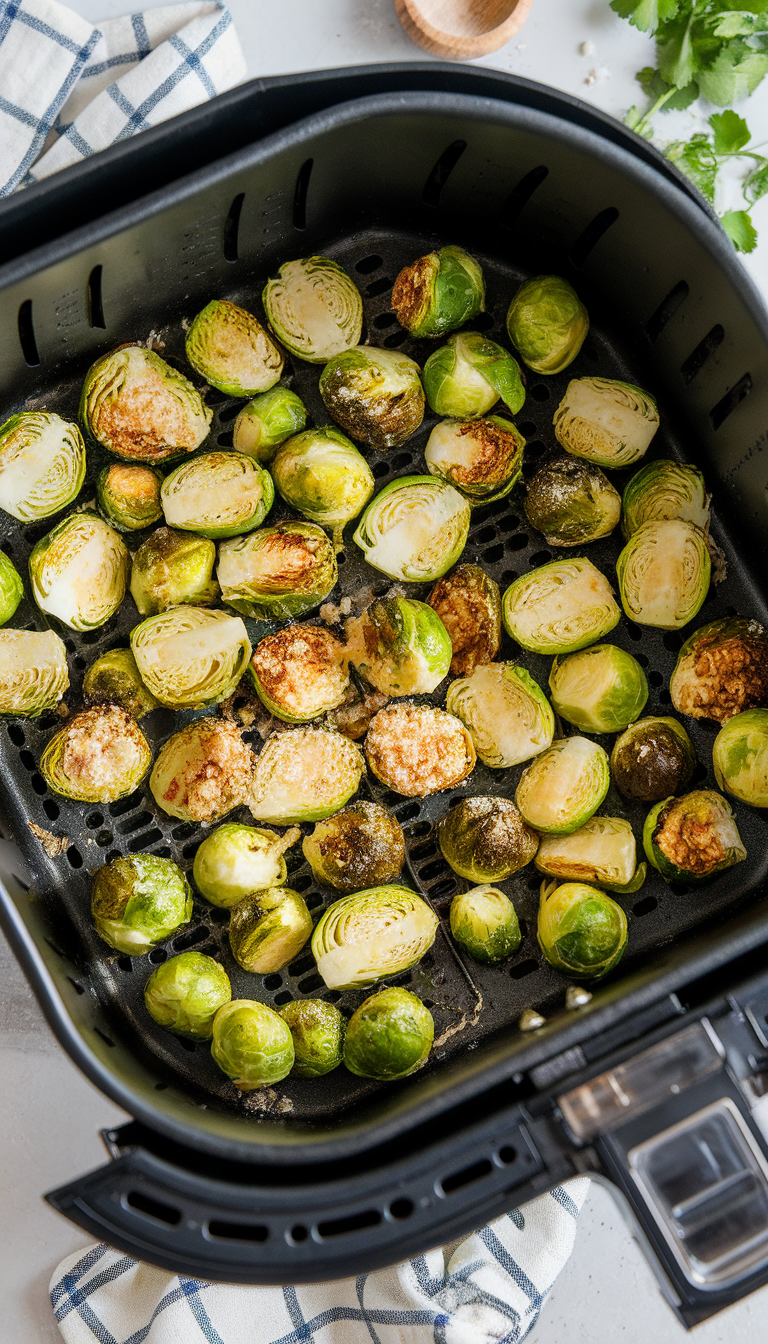
Prep Time: 5 minutes | Cook Time: 10 minutes | Yield: 4 servings
Brussels sprouts transform into addictively crispy little bites in the air fryer – say goodbye to soggy, boiled sprouts! This recipe roasts them with just a touch of oil, garlic, and parmesan for flavor. It’s a quick, healthy side dish that might convert any veggie skeptic.
Ingredients:
- 1 pound (450 g) Brussels sprouts, trimmed and halved
- 1 tablespoon olive oil
- 1/2 teaspoon garlic powder (or 2 cloves fresh garlic, minced)
- 2 tablespoons grated Parmesan cheese (optional, omit for vegan)
- 1/2 teaspoon salt, plus more to taste
- 1/4 teaspoon black pepper, to taste
- Squeeze of lemon juice (optional, for serving)
Instructions:
- Prep the Sprouts: Rinse Brussels sprouts and cut each in half through the stem. Pat dry. Smaller sprouts can be left whole (just cut an X in the bottom to help cook through). Dry sprouts will crisp up better.
- Season: In a bowl, toss the sprouts with olive oil, garlic powder, salt, and pepper until well coated. Tip: If adding parmesan, sprinkle it on after air frying so it doesn’t burn.
- Air Fry: Preheat air fryer to 380°F (193°C). Place the Brussels sprouts in the basket in a single layer (a little overlap is okay). Cook for about 8–10 minutes, shaking the basket halfway. The sprouts should become browned and crispy on the outside with tender centers. (For extra large sprouts, cook an additional 2-3 minutes.)
- Add Parmesan & Serve: If using parmesan, immediately sprinkle the hot sprouts with the cheese and toss gently so it melts a bit. A squeeze of fresh lemon juice on top brightens the flavors. Serve hot as a side dish or snack.
Nutritional Benefits: Brussels sprouts are a low-calorie, high-fiber vegetable packed with vitamins. They’re especially high in vitamin K and vitamin C, supporting bone health and immunity. Air frying these sprouts with minimal oil keeps them very light (no heavy butter or oil as in some recipes), yet they taste indulgently crispy. This dish is also a great way to eat more cruciferous veggies, which are known for their cancer-fighting antioxidants. Enjoy a bowl of these crunchy sprouts and you’ll get a nutritious boost alongside that savory flavor.
3. Spicy Buffalo Cauliflower Bites (Air-Fried)
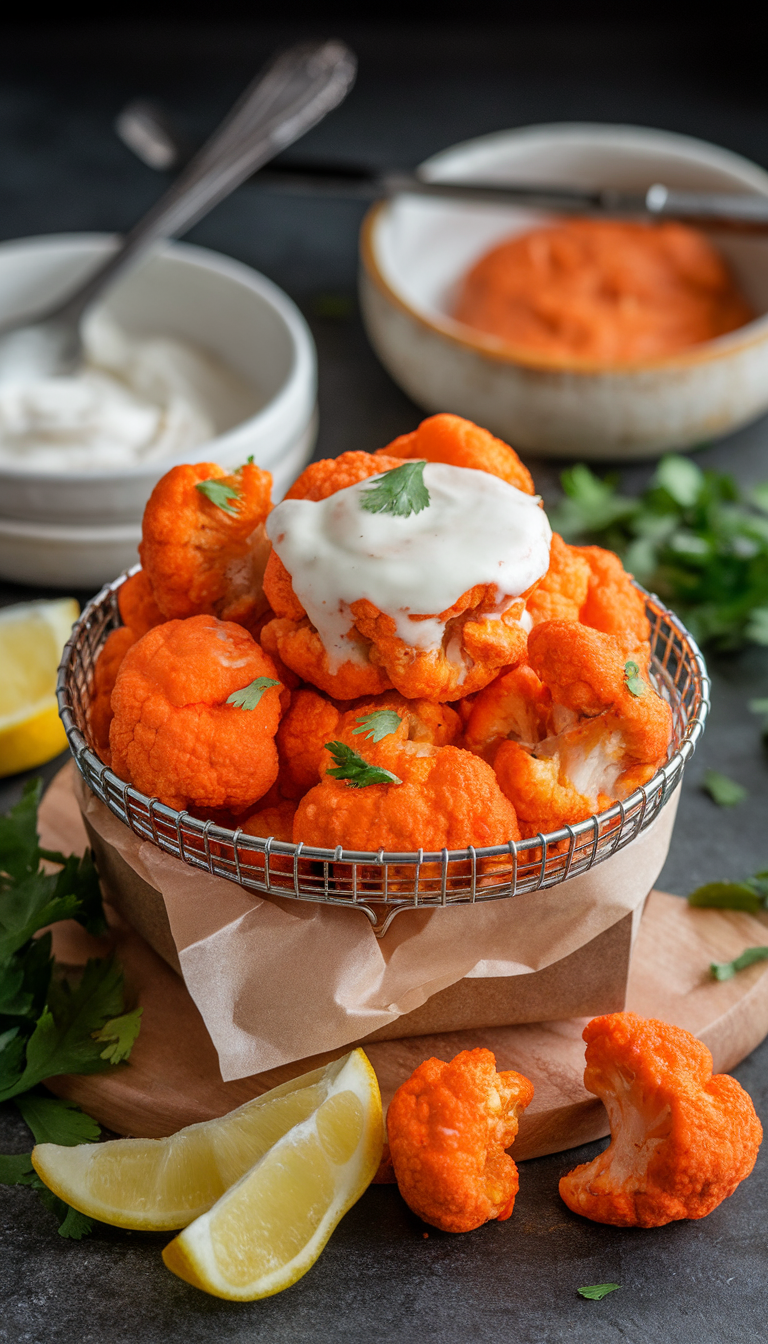
Prep Time: 15 minutes | Cook Time: 12 minutes | Yield: 4 servings
Craving buffalo wings but want a vegetarian, lighter option? Buffalo cauliflower bites to the rescue! Air frying cauliflower florets coated in a spicy batter makes them wonderfully crispy outside and soft inside. Tossed in tangy hot sauce, they’re perfect for game day or as a party appetizer – all the buffalo flavor with none of the deep-fried guilt.
Ingredients:
- 1 medium head cauliflower, cut into bite-sized florets
- 1/2 cup whole wheat flour (or chickpea flour for gluten-free)
- 1/2 cup water (adjust to make a batter consistency)
- 1 teaspoon garlic powder
- 1/2 teaspoon paprika
- 1/2 teaspoon salt
- 1/4 teaspoon black pepper
- For Buffalo Sauce: 1/4 cup hot sauce (like Frank’s RedHot), 1 tablespoon melted butter (or olive oil for healthier option), 1 teaspoon honey (optional, for a touch of sweetness)
Instructions:
- Make Batter: In a mixing bowl, whisk flour, garlic powder, paprika, salt, and pepper. Add water and stir to create a thick batter (similar to pancake batter). If too thick, add a spoonful more water.
- Coat Cauliflower: Dip each cauliflower floret into the batter, shaking off excess. You want a light coating. (This batter creates a nice crust without needing eggs or deep frying.)
- Air Fry in Batches: Preheat air fryer to 370°F (188°C). Lightly grease the air fryer basket with cooking spray. Arrange battered cauliflower in a single layer (cook in 2–3 batches to avoid overcrowding). Air fry for 10–12 minutes, flipping or shaking halfway through, until the florets are golden-brown and crispy. The coating will firm up and get slightly browned.
- Toss in Buffalo Sauce: While cauliflower cooks, warm the hot sauce, butter (or olive oil), and honey in a small saucepan or microwave until combined. When cauliflower bites are done, gently toss them in a bowl with the buffalo sauce to coat. (For extra crispness, you can return them to the air fryer for 2 more minutes after saucing, but it’s optional.)
- Serve: Serve immediately with a side of cooling ranch or blue cheese dip (or a yogurt-based dip for a healthier choice) and celery sticks. Enjoy the spicy crunch!
Nutritional Benefits: By using cauliflower instead of chicken, this appetizer is lower in calories and provides fiber and vitamin C from the veggies. Air frying means we use very little oil – just enough in the batter and sauce for flavor – making these bites much lighter than typical buffalo wings. Cauliflower is also rich in antioxidants and phytochemicals. Using whole wheat or chickpea flour adds extra fiber and nutrients compared to refined flour. You’ll get the kick and crunch of buffalo wings in a more heart-friendly, plant-based package.
4. Chili-Lime Crispy Chickpeas
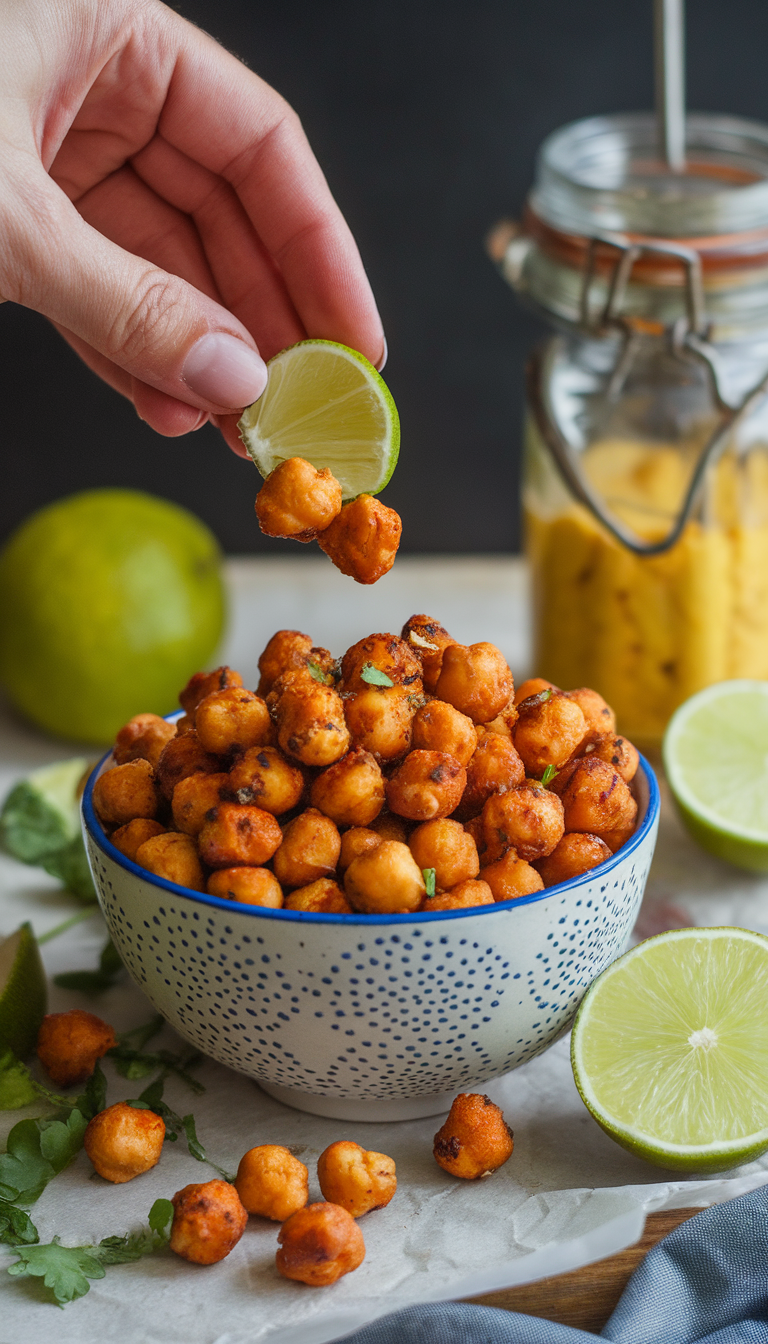
Prep Time: 5 minutes | Cook Time: 15 minutes | Yield: 4 servings (as a snack)
For a crunchy snack that’s actually good for you, try air fryer roasted chickpeas! They turn out delightfully crispy – almost like peanuts or chips – and you can season them any way you like. This recipe uses a zesty chili-lime seasoning for a flavorful kick. It’s perfect for nibbling, or even as healthy “croutons” on salads and soups.
Ingredients:
- 1 can (15 oz / 425 g) chickpeas (garbanzo beans), drained and rinsed
- 2 teaspoons olive oil or avocado oil
- 1 teaspoon chili powder
- 1/2 teaspoon ground cumin
- 1/2 teaspoon garlic powder
- 1/2 teaspoon salt (plus more to taste)
- 1 lime, zest and juice (use zest before cooking, and juice after)
Instructions:
- Dry the Chickpeas: After rinsing the chickpeas, pat them very dry with a kitchen towel or paper towels. Removing surface moisture is key to getting them crunchy. You can even let them air-dry for a few minutes. Remove any loose skins (optional, for better texture).
- Season: In a bowl, toss chickpeas with the olive oil, chili powder, cumin, garlic powder, and salt, plus the lime zest. (We’ll add lime juice later so it doesn’t prevent crisping.) Make sure the chickpeas are evenly coated in oil and spices.
- Air Fry: Preheat air fryer to 380°F (193°C). Spread the chickpeas in the basket in a single layer. Cook for 12–15 minutes total, shaking the basket every 5 minutes for even cooking. The chickpeas are done when they are golden-brown and crunchy. (Taste one to check – if it’s still soft in the middle, give them a couple more minutes. But be careful not to burn them.)
- Finish with Lime: Immediately after air frying, squeeze the lime juice over the warm chickpeas and toss. The citrusy touch really brightens the flavor. Sprinkle a bit more salt if needed.
- Cool & Store: Let the chickpeas cool for a few minutes – they will get even crispier as they cool. Enjoy them as a snack once cooled enough to handle. If you have leftovers, store in an open container (to prevent trapping moisture) – they’ll stay fairly crisp for a day or two.
Nutritional Benefits: Chickpeas are a fantastic healthy snack option – they’re high in fiber and plant protein, which helps keep you full and supports steady blood sugar. By air-frying instead of buying packaged fried snacks, you avoid excess oil and additives. This recipe uses minimal oil, so the chickpeas come out low in fat but still satisfyingly crunchy. You also get iron, B-vitamins, and magnesium from chickpeas. The chili-lime seasoning adds bold flavor without any need for heavy sauces. Munch on these crispy chickpeas knowing you’re fueling your body with protein and nutrients – it’s snacking done right!
5. Crunchy Whole-Wheat Air Fryer Chicken Tenders
Prep Time: 15 minutes | Cook Time: 12 minutes | Yield: 4 servings
Fried chicken lovers, rejoice – you can enjoy crispy chicken tenders without deep frying! These air fryer chicken tenders are coated in whole-wheat breadcrumbs and a touch of parmesan for a crunchy crust. They come out golden and juicy, yet use far less oil than traditional fried chicken. Kid-friendly and adult-approved, they make a great healthy dinner or lunch.
Ingredients:
- 1.5 lbs (680 g) chicken breast tenders or strips (or use boneless skinless chicken breasts cut into 1-inch thick strips)
- 1/2 cup whole-wheat breadcrumbs (panko works great for extra crunch)
- 2 tablespoons grated Parmesan cheese (optional, adds flavor and crispness)
- 1 teaspoon paprika
- 1/2 teaspoon garlic powder
- 1/2 teaspoon salt
- 1/4 teaspoon black pepper
- 1–2 eggs, beaten (for dredging)
- Olive oil cooking spray (or 1 tablespoon olive oil)
Instructions:
- Prep Chicken: If using whole chicken breasts, slice them into strips (about 1 inch thick) to form “tenders.” Pat the chicken pieces dry with a paper towel and season lightly with a pinch of salt and pepper.
- Prepare Breading Station: In a shallow bowl or plate, combine the whole-wheat breadcrumbs, Parmesan, paprika, garlic powder, salt, and pepper. Mix well. In another bowl, have the beaten eggs ready.
- Bread the Chicken: Dip each chicken piece into the egg, let the excess drip off, then press it into the breadcrumb mixture, coating all sides. Place the breaded chicken on a plate. Repeat for all pieces. (The whole-wheat breadcrumbs add fiber and nutrients, making this a healthier breading than refined flour.)
- Air Fry: Preheat air fryer to 380°F (193°C). Lightly spray the air fryer basket with cooking spray to prevent sticking. Arrange the chicken tenders in a single layer (you may need to cook in two batches). Spray the tops of the breaded tenders lightly with olive oil spray (this helps them crisp and turn golden). Air fry for 10–12 minutes, flipping halfway. They should be crispy and golden brown on the outside, and the chicken should reach an internal temperature of 165°F (74°C). If not, cook 2-3 minutes more.
- Serve: Remove the chicken tenders and let them rest 2 minutes. Serve warm with a healthy dipping sauce like honey mustard made with Greek yogurt, or a side of marinara. These tenders pair well with a salad or the sweet potato fries from Recipe #1 for a balanced meal.
Nutritional Benefits: By air frying, we eliminate the need for deep-fry oil while still getting that crunchy coating. The chicken provides lean protein without excess breading or grease, helping keep the dish lower in fat and calories than fast-food nuggets or fried chicken. Using whole-wheat breadcrumbs adds fiber, B-vitamins, and minerals that you wouldn’t get with white flour breading. Overall, these chicken tenders are a lighter choice that doesn’t sacrifice flavor or texture – you still get that satisfying crunch! It’s a great way to enjoy “fried” chicken as part of a healthy diet.
6. Air Fryer Salmon with Lemon and Dill
Prep Time: 5 minutes | Cook Time: 8 minutes | Yield: 4 servings
Fish in the air fryer? Absolutely! Salmon cooks beautifully in an air fryer – it stays moist inside while the edges get lightly crisp. This recipe is as simple as it gets: salmon fillets with a drizzle of olive oil, lemon, and herbs. It’s a quick, protein-packed meal for busy nights, and it’s full of heart-healthy fats.
Ingredients:
- 4 salmon fillets (about 6 oz or 170 g each), skin removed (or leave skin on if you like it crispy)
- 1 tablespoon olive oil
- 2 teaspoons garlic powder (or 4 cloves fresh garlic, minced)
- 1 teaspoon dried dill (or 1 tablespoon fresh dill, chopped)
- Salt and black pepper, to taste
- Lemon wedges, for serving
Instructions:
- Season the Salmon: Pat salmon fillets dry. Brush or rub each fillet with a bit of olive oil. Season with garlic powder, dill, salt, and pepper. (You can also use other favorite seasonings or a pre-made fish rub. The olive oil helps keep the fish moist and promotes browning.)
- Air Fry: Preheat the air fryer to 400°F (200°C) for a couple of minutes. Place salmon fillets in the basket, not touching each other. Air fry at 400°F for 7–9 minutes, depending on thickness. For average 1-inch thick fillets, about 8 minutes yields a perfect cook: the salmon will be opaque and flake easily with a fork, with a light crisp on the outside. No need to flip the fillets unless they are very thick (if so, you can flip at the 5-minute mark).
- Check Doneness: Salmon is done when it reaches an internal temp of 145°F (63°C) at the thickest part, or when the flesh flakes and is opaque. If it’s not quite done, air fry 1-2 minutes more. Be careful not to overcook – air fryer cooks quickly!
- Serve: Remove salmon carefully with a spatula. Squeeze fresh lemon juice over each fillet for brightness. Serve with extra lemon wedges. This salmon is great alongside steamed veggies or over a salad for a light meal.
Nutritional Benefits: Salmon is an excellent source of lean protein and omega-3 fatty acids. Omega-3s are heart-healthy fats that support brain and heart health. By air frying, we don’t need any breading and use very little oil, so the salmon remains a very healthy, low-carb dish. You get all the benefits of salmon (vitamins D and B12, selenium, and those omega-3s) without added calories. This recipe is also naturally keto and paleo-friendly. It’s proof that healthy air fryer recipes can be both nutritious and incredibly tasty – this salmon comes out so tender and flavorful in minutes, making healthy eating easy.
7. Herb-Marinated Air Fryer Tofu Cubes
Prep Time: 10 minutes (plus 30 min pressing time) | Cook Time: 12 minutes | Yield: 4 servings
Even tofu skeptics will enjoy this one – air-fried tofu turns crispy on the outside and fluffy inside, a bit like chicken nuggets! We’ll marinate extra-firm tofu in a savory herb mixture and then air fry it to golden perfection. It’s a great vegetarian protein to add to rice bowls, stir-fries, or salads, and it’s much healthier than frying tofu in oil.
Ingredients:
- 1 block (14–16 oz, ~400 g) extra-firm tofu
- 1 tablespoon soy sauce or tamari (use tamari or coconut aminos for gluten-free)
- 1 teaspoon olive oil or sesame oil
- 1 teaspoon garlic powder
- 1/2 teaspoon onion powder
- 1 teaspoon paprika (can use smoked paprika for smoky flavor)
- 1/2 teaspoon dried thyme (or dried oregano/basil mix)
- 1/2 teaspoon salt
- 1/4 teaspoon black pepper
- 2 teaspoons cornstarch (or arrowroot powder)
Instructions:
- Press the Tofu: Drain the tofu and wrap it in paper towels or a clean kitchen towel. Place it on a plate and set something heavy on top (like a skillet or a couple of books). Let it press for about 30 minutes to remove excess water. This step is key for getting really crispy tofu.
- Cut and Marinate: Unwrap the tofu and cut it into cubes (about 1 inch/2.5 cm pieces). In a bowl, mix the soy sauce, oil, garlic powder, onion powder, paprika, thyme, salt, and pepper. Toss the tofu cubes in this marinade gently, making sure each piece is coated. Sprinkle the cornstarch over the tofu and toss again – the cornstarch forms a light coating that crisps up the exterior. Let marinate for 5-10 minutes if you have time (or longer in the fridge for more flavor).
- Air Fry: Preheat air fryer to 375°F (190°C). Place the tofu cubes in the basket in a single layer with a little space around each (cook in two batches if needed). Air fry for 10–12 minutes, shaking the basket or flipping the tofu pieces halfway through. The tofu is done when it’s golden-brown and crispy on the outside. If you like it even crunchier, add 1-2 more minutes.
- Serve: Remove the crispy tofu bites. They’re ready to eat as-is or with a dipping sauce. You can also toss them in a stir-fry, add to a grain bowl with veggies, or top a salad. These make a great high-protein snack too, especially with a spicy sriracha or peanut dipping sauce.
Nutritional Benefits: Tofu is a lean plant-based protein that’s low in calories and contains no cholesterol. It’s also a good source of iron and calcium (if calcium-set tofu). By air frying with just a touch of oil, we get a texture similar to fried tofu but with vastly reduced fat. This recipe is vegan and can fit into a variety of diets. Tofu provides all essential amino acids, making it a complete protein, and it’s much lighter than breaded fried meat alternatives. With the herbs and spices, these tofu cubes are flavorful as well as healthy. It’s a perfect example of how the air fryer can make vegetarian proteins more appealing and convenient. Enjoy these crispy tofu bites guilt-free!
8. Easy Air Fryer Falafel (Chickpea Patties)
Prep Time: 20 minutes | Cook Time: 15 minutes | Yield: ~15 falafel balls (4-5 servings)
Falafel – those delicious Middle Eastern chickpea fritters – are traditionally deep fried, but they turn out wonderfully in the air fryer with almost no oil! This air fryer falafel recipe packs in herbs and spices for authentic flavor. You’ll get a crispy exterior and tender interior, perfect for stuffing into pitas or serving with salad and hummus. It’s a fantastic healthy appetizer or meatless meal.
Ingredients:
- 1 can (15 oz / 425 g) chickpeas, drained and rinsed (see note)
- 1/2 small onion, roughly chopped
- 2 cloves garlic, roughly chopped
- 1/2 cup fresh parsley leaves (packed)
- 1/2 cup fresh cilantro leaves (packed)
- 1 teaspoon ground cumin
- 1 teaspoon ground coriander
- 1/2 teaspoon salt (to taste)
- 1/4 teaspoon black pepper
- 1/4 teaspoon baking powder (helps lighten the texture, optional)
- 3 tablespoons all-purpose flour or chickpea flour (use chickpea flour to keep it gluten-free)
- Olive oil cooking spray
Instructions:
Note: Traditional falafel uses dried chickpeas soaked overnight (not cooked). You can use that (about 3/4 cup dried chickpeas, soaked and drained), which gives a more authentic texture. But for convenience, this recipe uses canned chickpeas – it’s easier for most home cooks and still tasty.
- Make Falafel Mixture: In a food processor, combine chickpeas, onion, garlic, parsley, cilantro, cumin, coriander, salt, pepper, and baking powder. Pulse the mixture until it is well combined but still somewhat coarse – you want a rough paste with small chunks, not completely smooth. Scrape down sides as needed.
- Add Flour: Sprinkle the flour into the mixture and pulse a few more times. The flour binds the mixture. It should be moist but able to hold shape when formed. If it’s too sticky or loose, add another tablespoon of flour.
- Form Balls: Scoop tablespoons of the mixture and form into small balls or patties (about 1.5 inches in diameter). You should get roughly 15 pieces. Don’t pack them too tight; just enough to hold together. Place the falafel balls on a plate. If you have time, refrigerate for 15-20 minutes – this helps them firm up (but not mandatory).
- Air Fry: Preheat air fryer to 350°F (175°C). Lightly grease the basket with a bit of cooking spray or brush of oil. Arrange falafel in a single layer with space between (cook in batches if necessary). Give the tops of the falafel a light spray of oil as well. Air fry for 8 minutes, then gently flip the falafel (or just shake the basket). Air fry for another 5–7 minutes on the other side. The falafel should be browned and crispy on the outside. Remove when they look nicely crisp.
- Serve: Serve warm falafel in warmed pita bread with lettuce, tomato, cucumber, and a drizzle of tahini sauce or yogurt sauce for a classic presentation. Or serve them on a salad or as bite-sized appetizers with a tzatziki dip.
Nutritional Benefits: These falafel are packed with plant protein and fiber from the chickpeas and are loaded with herbs (parsley and cilantro) which bring vitamins and antioxidants. By air frying instead of deep frying, we dramatically cut down the oil and calorie content – yet you still get the satisfying crunchy texture. Chickpeas are a slow-digesting carbohydrate, which means falafel can keep you full without spiking blood sugar. This recipe is also vegan and can be made gluten-free, fitting many diets. Enjoy the rich, aromatic flavor of falafel with a lot less oil – your heart (and waistline) will thank you.
9. Southwest Stuffed Bell Peppers (Air Fryer Style)
Prep Time: 15 minutes | Cook Time: 12 minutes | Yield: 4 servings (4 pepper halves)
Stuffed peppers are a wholesome meal on their own – and they cook up quickly in the air fryer! In this healthy take, we use colorful bell peppers filled with a tasty mixture of quinoa, black beans, and corn (for a vegetarian protein boost) and just a sprinkle of cheese on top. The air fryer roasts the peppers nicely and melts the cheese to bubbly perfection. It’s an easy way to enjoy a comfort food in a lighter way.
Ingredients:
- 2 large bell peppers (any color: red, yellow, orange, or green)
- 1 cup cooked quinoa (about 1/3 cup dry, cooked beforehand) – or use brown rice
- 1 cup canned black beans, drained and rinsed
- 1/2 cup corn kernels (canned or frozen & thawed)
- 1/2 cup diced tomatoes (fresh or from can, drained)
- 1 teaspoon ground cumin
- 1/2 teaspoon chili powder
- 1/2 teaspoon garlic powder
- 1/2 teaspoon salt (to taste)
- 1/4 cup shredded cheddar or Monterey jack cheese (or a vegan cheese alternative)
- Fresh cilantro or parsley for garnish (optional)
Instructions:
- Prep Peppers: Cut the bell peppers in half lengthwise and remove the seeds and membranes. You’ll have 4 pepper halves “cups.” Brush or spray the outside of the peppers with a tiny bit of oil (this helps them roast).
- Mix Filling: In a bowl, combine the cooked quinoa, black beans, corn, diced tomatoes, cumin, chili powder, garlic powder, and salt. Stir until everything is well mixed. This filling is high in fiber and protein, making the dish very hearty and healthy. (If you want to add meat, you could mix in 1/2 cup of cooked ground turkey – but we’re keeping this version vegetarian.)
- Stuff Peppers: Spoon the filling into each bell pepper half, packing it in. Depending on the size of your peppers, you might have some filling left over (it’s great on its own or as a salad topper). Leave a little room at the top of each pepper for the cheese.
- Air Fry in Two Stages: Preheat air fryer to 360°F (182°C). Place 2 stuffed pepper halves (or as many as fit in a single layer) in the basket. Cook for 8 minutes initially – this heats the filling and softens the peppers. Then carefully open the fryer and sprinkle shredded cheese on top of each pepper. Close and air fry for another 3–4 minutes until the cheese is melted and starting to brown. The peppers should be tender (you can pierce with a fork to check). Remove and repeat with remaining pepper halves.
- Serve: Garnish the stuffed peppers with fresh cilantro or parsley if desired. Serve hot. These make a balanced meal as is, or pair with a green side salad. You can also top with a dollop of Greek yogurt or guacamole for extra flavor instead of sour cream.
Nutritional Benefits: Each stuffed pepper is like a balanced meal – you’ve got lots of veggies (vitamin C-rich bell peppers), plant protein and fiber from the black beans and quinoa, and a controlled amount of fat from just a bit of cheese. By air-frying, we achieve a roasted, caramelized pepper flavor in a fraction of the time of baking. We also avoid using any heavy oil or breadcrumbs. The result is a low-fat, high-fiber dish that’s very filling. Quinoa is a whole grain rich in protein and contains all essential amino acids, and black beans contribute additional protein, fiber, iron, and magnesium. This meal is gluten-free naturally and can be made vegan by omitting or substituting the cheese. It’s a heart-healthy, nutrient-dense dinner that doesn’t skimp on taste.
10. Cinnamon Apple Chips in the Air Fryer
Prep Time: 5 minutes | Cook Time: 15 minutes | Yield: 2–3 servings
Got a sweet tooth? Skip the cookies and try these cinnamon apple chips instead! Using an air fryer, you can make your own apple chips that are crunchy and sweet with no added sugar (just a touch of spice). They’re like a healthy version of potato chips or candy – kids and adults alike will enjoy munching on these. Plus, your kitchen will smell amazing while they cook.
Ingredients:
- 2 medium apples (e.g., Honeycrisp, Gala, Fuji – any variety you like)
- 1/2 teaspoon ground cinnamon
- 1/4 teaspoon ground ginger (optional, for a gingerbread-like warmth)
- A pinch of nutmeg or allspice (optional)
- Cooking spray (light oil mist)
Instructions:
- Slice Apples: Using a sharp knife or mandolin slicer, cut the apples into very thin rounds (approximately 1/8-inch or 3 mm thick). The thinner the slices, the crisper the chips. You can core the apples first if you want ring-shaped chips, or just slice through the core and remove any seeds from the slices. Tip: Consistent thickness is important so they cook evenly.
- Season: In a bowl, mix the cinnamon, ginger, and any other spices you’re using. Lightly mist the apple slices with cooking spray (or toss gently with a tiny bit of oil – like 1/2 teaspoon just to very lightly coat). Then sprinkle the spice mix over the apple slices, tossing to distribute evenly. The natural sweetness of apples means we don’t need any sugar.
- Air Fry: Preheat air fryer to 300°F (150°C). Arrange the apple slices in a single layer in the basket, with a little space between slices (you’ll likely need to do 2–3 batches). Air fry at 300°F for 8 minutes, then flip the apple slices (or just shake/rotate them) and cook for another 5–7 minutes. Keep an eye on them in the last few minutes to prevent burning – they should turn golden brown and feel mostly dry. If they are still a bit soft, you can add a minute or two, but note they will crisp up more as they cool.
- Cooling = Crisping: Remove the apple chips to a wire rack or plate and let them cool for 5-10 minutes. As they cool, they will become more crisp. If any are still a little pliable, you can put them back in the air fryer for another minute, but usually letting them sit does the trick.
- Serve/Store: Enjoy the apple chips as a healthy snack. If making a big batch, store completely cooled chips in an airtight container. (However, truly oil-free apple chips can absorb moisture from air and soften, so they’re best eaten fresh on the day or stored with a paper towel in the container.)
Nutritional Benefits: Apples are high in fiber (especially if you leave the skin on) and provide vitamins like C and various antioxidants. By air frying, we’re essentially dehydrating the apples into chips without needing any sugar or deep frying. This means you get a sweet, crunchy snack that is fat-free and much lower in calories than fried snacks or baked goods. It’s a great way to satisfy a craving for something crunchy-sweet while still sticking to a healthy diet. Cinnamon and ginger add flavor and have their own health benefits (cinnamon can help regulate blood sugar, ginger aids digestion). These apple chips make a great lunchbox treat or movie-night snack that you can feel good about eating.
Air Fryer Cooking Tips for Healthy, Crispy Results
Cooking with an air fryer is pretty straightforward, but a few tips can help you get the crispiest, tastiest results and keep your air fryer in great shape:
- Don’t Overcrowd the Basket: For anything you want crispy, make sure to cook in a single layer with space around the food. Overcrowding will block air circulation, leading to uneven cooking and less crunch. It’s better to cook in batches for the best result. Remember: crowded food = soggy food in an air fryer. Give those fries or nuggets some elbow room!
- A Little Oil Goes a Long Way: While you can air fry with absolutely no oil, using just a tiny bit (like a teaspoon or a few spritzes from an oil mister) can greatly improve browning and crispiness. Lightly coating veggies or protein helps the outside get that golden color. Choose heart-healthy oils like olive or avocado oil, and avoid aerosol cooking sprays that can damage your air fryer’s nonstick coating. Instead, use a refillable oil mister or brush on the oil.
- Preheat for Best Results: Many air fryers advertise “no preheat needed,” but preheating can help if you want super crispy outcomes. Let the air fryer run empty for 2–3 minutes up to the cooking temperature before adding your food. This is especially helpful for meats, so they sear quickly. (For things like baked goods or when you want a gentler cook, preheating isn’t as crucial.)
- Shake or Flip Halfway: To ensure even cooking, shake the basket or flip larger items halfway through the cook time. This redistributes the food for more even exposure to the hot air. Most recipes above include a shake/flip step – it prevents one side from getting too browned and the other side from undercooking.
- Pat Food Dry: Excess surface moisture can hinder crisping. If you’re air frying foods that were marinated or frozen (like frozen veggies that thaw and have ice crystals), pat them dry before seasoning and cooking. Dry food + a light coat of oil = maximum crunch.
- Use Parchment for Messy Foods: If you’re cooking something with a glaze or that might melt (cheese!), consider using perforated parchment paper liners made for air fryers. They prevent sticking and make cleanup easier. Don’t completely cover the basket (airflow is key), but a few holes in parchment or using air fryer-safe silicone mats can save you scrubbing. Always place liners with food on them (never preheat with parchment alone, it could fly up into the heating element).
- Keep It Clean: Clean your air fryer after each use, once it’s cooled down. Bits of food or grease left in the basket can burn or smoke the next time. Most baskets and trays are dishwasher safe, or you can hand wash with warm soapy water. Avoid abrasive scrubbers that could scratch the nonstick surface. Regular cleaning not only prevents off-flavors and smoke but also prolongs the life of your appliance.
- Adjust Time/Temp for Your Model: Air fryer models can vary in intensity. Use our recipe times as guidelines, but keep an eye on your food the first time you try a recipe. You might find you need to reduce or increase cook time by a couple minutes based on your machine. After a few uses, you’ll get a feel for what temperature and timing yields the best results in your specific air fryer.
With these tips, you’ll be well on your way to air frying like a pro! The key is a bit of practice – soon you’ll know exactly how to make your food come out just the way you like it: perfectly crispy on the outside and cooked right on the inside, all while keeping things healthy.
FAQs
Q: Are air fryer recipes really healthier than deep-fried recipes?
A: Yes – in most cases, air frying is a healthier cooking method than deep frying. Because air fryers use significantly less oil, the fat and calorie content of foods can be much lower. For example, studies show that air-fried foods have much less fat than deep-fried versions, and using an air fryer can cut the calories from fat by up to 80%. Plus, air frying avoids the hydrogenated oils and trans fats often used in deep frying. The result is crispy, tasty food that’s much better for your waistline and heart health.
Q: Do I need to preheat my air fryer before cooking?
A: Preheating isn’t always required, but it can help ensure crispier results and more even cooking. Many recipes (including some above) benefit from a short preheat, especially when cooking meats or wanting a good sear. Some newer air fryers automatically preheat. As a rule of thumb, if you want something very crispy or you’re cooking a thicker piece of protein, a 2-3 minute preheat at the desired temperature is a good idea. For frozen foods or baked goods, you can often skip preheating. Always check your air fryer’s manual – if it says no preheat needed, it’s calibrated for that.
Q: How much oil should I use in an air fryer?
A: A very small amount. Typically 1-2 teaspoons of oil (or a light spray) is enough for most recipes in an air fryer, and some recipes use none at all. The goal is to lightly coat the surface of the food so it can crisp up and brown. Using too much oil can actually make foods soggy and defeat the purpose of air frying. Stick to heart-healthy oils and apply just a thin layer. Remember, even with that small amount, you’re still using far less oil than deep frying, which can require cups of oil.
Q: What types of foods can I cook in an air fryer?
A: The possibilities are endless! You can cook almost anything in an air fryer that you would in an oven – and more. Popular choices include fries, chicken wings, chicken breasts/tenders, fish fillets, shrimp, steaks, roasted vegetables, and even baked goods like donuts or cookies. The 10 healthy air fryer recipes above show the range: from veggies and proteins to snacks and fruit chips. You can also reheat leftovers in the air fryer to bring back their crunch. Just avoid foods with very wet batter (they can drip and make a mess) – unless you use a special accessory – and be mindful that lightweight foods (like leafy greens) might fly around due to the fan. With a little creativity, you’ll find you can adapt many of your favorite recipes for the air fryer.
Q: How do I prevent food from sticking to the air fryer basket?
A: To keep food from sticking, make sure to lightly grease the basket or tray with a high-heat safe oil before cooking. You can use a cooking spray (one without propellants that harm nonstick coating) or just brush on a tiny bit of oil. Parchment paper liners (with holes) can also help with delicate foods or marinades. Also, avoid using aerosol non-stick sprays that aren’t meant for air fryers, as they can damage the coating over time. If you properly clean your basket and reapply a little oil when needed, food should release easily. Silicone tongs or spatulas are best for removing food to avoid scratching the basket.
Enjoy your journey into healthy air fryer cooking! With these recipes and tips, you can crunch away on guilt-free “fried” foods any day of the week. Happy air frying and happy eating!